Monday, March 28, 2011

Functional creation

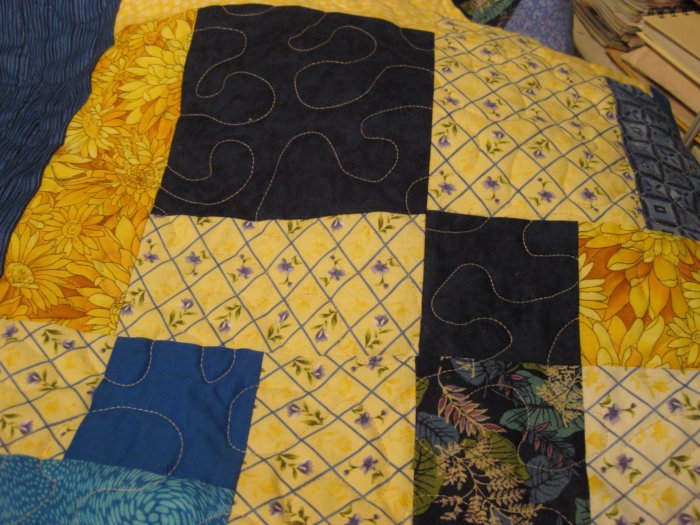
Well, a little outside the usual realm of quilting, but right up my alley of sewing functional things....

My daughter and son-in-law have a vacuum cleaner with a lot of little bits of attachments. They asked if there was something I could make to hang them in so that they were not just sitting in a box on the floor.

So I started laying them out and figuring out what I could do with them. A hanging pocket panel would be perfect. I thought about putting grommets in the top but my husband suggested using a coat-hanger, then it could be hung on a nail in a storage room, or hung in a closet. So I went to work.

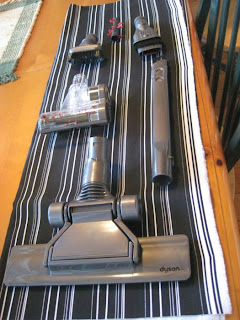
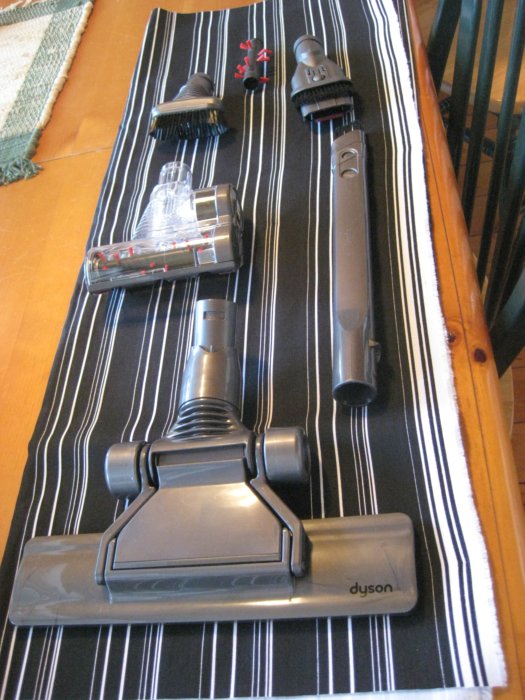
I had some issues with the large attachment in the bottom pocket because it was kind of top heavy..no matter how I put it in....and it kept pulling the pocket open and then falling out.  Solution????
I added a piece of cardboard in behind to give it some support...

worked like a charm!!

So every attachment has it's own little pocket, and it is attached to the coat-hanger with velcro, so just in case the hanger breaks, or whatever, it is removable. Done and done!!

Saturday, March 26, 2011

Salvage job

My mother,who  passed away last year at 95 years old, had made quilts for my children when they were young. They are not made of very good material, I think most are scraps from some of our old clothing- I see one of my sun-dresses in there!! Anyway, my daughter was telling me that her quilt was torn in places, so I offered to try to repair it.

Mostly it was one of the sailboats that was tattered, and a bit of wear on the binding. The whole thing is hand quilted by my mom, so I really didn't want to start taking the quilt apart to repair it.

I decided to try just adding an appliqué over top of the existing material. So I drew a template on paper and used that to cut the pieces. I added a generous 1/4 inch to turn under.

Then pinned them in place and carefully hand stitched them over the torn parts...

I still have to try to find some fabric to patch the border where it is torn, but I think it worked out pretty well!!

Wednesday, March 23, 2011

New Buttons!

I am so excited, I won some of those beautiful little buttons!! Aren't they just the cutest .....

Barb, over at Bejeweled quilts had a give away!!  And now go check out the Button page at - Button Mad, they are giving away penguin buttons!

I can think of a lot of places I can use them......wont' they just add the finishing touches to my little handbags....or on a wall hanging or fibre art? Maybe along the edge of a fabric bowl?

I have mentioned them before, but would like to tell you a bit more about them. The are all hand made by women in South Africa. This is some information from their website: Incomparable Buttons. There is lots more about them on the webpage, but this tells you about the buttons. There is a whole catalogue and they ship worldwide.  I gotta get me some more of these : )

"Each button and craft piece is made and painted entirely by hand. Every button, once made is dried outside in the warm South African sun then fired to a bisque and hand painted. At this stage they are taken through a 24 hour firing to the hottest temperature the colours will withstand so as to ensure their complete durability and extreme hardiness.


Incomparable buttons are fully washable and dry cleanable. This is a first for ceramic buttons and offers sewers, knitters, crafters and clothing manufacturers a great new alternative to plastic. With embellishment becoming ever more popular, the buttons are also perfect for quilters and cross stitchers who are looking to add a unique finishing touch to their projects - as well as for many many different craft applications." (from Incomparable Buttons)


Sunday, March 20, 2011

Back to the DayDream

The problem with working on more than one thing at a time is that I forget what my plans were when I pull out a project. I am sewing some more blocks for the DayDream quilt...can't remember what size I had in mind when I started this....or maybe I didn't have a size in mind....

I always have a problem deciding how big to make a quilt. My thinking is ...if I am going to do that much work, it needs to be big enough to be useful...but how big is that? The books don't all agree either, but basically give the following dimensions:

Twin: 69"x90"
Full: 84"x90"
Queen: 90"x90"
King: 106"x 98"

But to me that always sounds BIG!! And of course makes it more difficult to machine quilt as well.
You probably need that size if you are planning to use it as the bed cover, as it needs to hang down over the edges enough to cover the mattress. And the mattresses are are so thick now that does add a few more inches.  If I am giving it away, I am never sure what size would be the most useful for someone else.

I think for a "throw" about 50"x 60" or 70" is a nice size to curl up under. I guess the problem really is that I don't usually have a purpose in mind when I am making these. This one is just because it is so pretty and spring like, and it has been a long winter : )

If I use all the blocks that I have made from this, and add a border it will end up about 75"x 86"  That is still pretty big in my book! I bought some yardage of the yellow stripe fabric from this line (Dream On by Moda) when I was in Phoenix  to use for the border.
...... Bright and sunny : )

Friday, March 18, 2011

A warm hug on a cold day.

I love these fuzzy flannel quilts....just like a warm hug on a cold day!

They sew up very quickly too, so that is an added bonus..
It takes just about as long to cut all the edges as it does to sew it together !

But after a wash (maybe two) and dry, it warm and fuzzy! I love the soft colors on this one.

Tuesday, March 15, 2011

my darker side

I am so excited!! I promised myself that once I finished a few of these quilts, I could move on to something new. Well, I haven't exactly kept that promise, and have started a couple of new things along the way......but now that I have finished the Yellow Brick Road quilt I feel completely free to move on!!

I usually am drawn to bright colors. I love yellow and red, and green....and blue...and of course  white!
But I thought that I should try something different. I am going to try using dark colors.....

Not quite sure what I will do yet, but am looking through books and magazines to get some inspiration! ...so I am exploring my dark side :)

Monday, March 14, 2011

Thank you Cara

I am a winner! I got a message saying that I won  a copy of  Asian Fabric Magazine! I actually haven't seen this magazine before, so I am excited to have a look.  (I don't know which issue I have won, but they all look amazing!)

More important is the reason for the give away! This was from Cara Quilts and her posting : Basic Charity Challenge . There are so many people that don't have even the basic needs, and we are so fortunate. Cara's challenge was to drop off a donation at the nearest shelter for abused women/children or the homeless. Although it is a sad thing, I think we all have one of these near by. Even though the challenge is finished, it is a good reminder that we can help by small acts of kindness. Pick up some extra shampoo or toothpaste each week with your groceries, and soon you will have a bag of goodies to deliver. 

Saturday, March 12, 2011

Buttons!

If you like buttons, you have to check this out!!!  The blog is called ButtonMad


These buttons are all handmade, and they are sooooo cute!! There is a terrific story behind the button making as well. They are handmade in Africa, by African women.

There is a huge giveaway going on by Quilt Gallery, so you can browse through the whole catalogue! Only problem is you have to pick a favorite!

LOVE these little buttons!!

Friday, March 11, 2011

FYI

just saying.........finished !!


Thursday, March 10, 2011

6 hours later!

Well the good news it did not take me 6 hours to hand stitch the binding down on the Yellow Brick Road! But it did take a long time! Looks great though!
One thing I am not really happy with is my choice of thread. The thread on the back blends in completely and you cant even see the FMQ at  all. (which in some places isn't a bad thing)

On the front though I really didn't know what color to use. I didn't want to use blue because I thought that it would be too dark on all the yellow. But then I thought that yellow would be too bright on all the darker blues!
I finally choose an oatmeal color, which blends into the yellows and lighter blues, but stands out quite a bit on the darker colors.

I am not sure what the right answer is. I am sure that it boils down to a personal preference, and maybe I just need to learn what my preferences are. Maybe once I am more confident with my FMQ I will want the stitching to stand out more!  But it is finished and I am happy with the end result. ..and I learned a lot from quilting this one too.

Wednesday, March 9, 2011

What was I thinking?

Getting down the finish here on "Sunshine" my Yellow Brick Road quilt! I had cut this quilt out, and sewn the top together quite a long time ago, and then it sat there because I didn't know how to quilt it. So when I dug it out to practice my free motion on I found a bunch of strips that I assumed I had cut for the binding.

When I took a closer look at them they were all 3" by 18" !! What was I thinking?? I have no idea! I must have had a reason to cut them like that, wouldn't you think?  Anyway, looking at them I thought that there would be enough to do the binding. But you never know......my math skills are right up there with coloring inside the lines!
I can do multivariate analysis of variance (statistics) but often make simple mistakes measuring quilt strips!

Also, usually I do my bindings with 2 1/4 " strips, not 3". Why you might ask? Well, I don't really know. I think I read it somewhere, and tried it the first time I did a binding, and it worked for me. So I decided to stay with something that worked.  But....the idea of cutting a little strip off all those binding pieces was not appealing...(have I mentioned that I am really quite lazy??) So I decided to leave them as 3" and just make a wider binding. Sounds easy doesn't it??

 So I sewed all those little strips together. One thing I really LOVE about this sewing machine is the feature that closes up the plate into a little tiny hole. Small enough that your fabric doesn't get sucked down there and chewed up as you are starting off.

 It is great! And what is even greater, is that if you switch to zigzag, for example, which would break the needle into little pieces with that tiny hole......the machine automatically opens the slot back up again! AMAZING!!!

Anyway, back to the binding. ...because I wanted it wider, I left a 1/4 inch gap between the edge of the binding and the edge of the quilt..so it was actually a 1/2 inch seam...

I wasn't quite sure how the corners would turn out,because I was kind of making this up as I went along,  but no problem, they look great! And I like the look of the wider binding, especially with the stripes...
I decided to hand stitch this one! It really does look better  BUT....this quilt is 90 x90...(again....What was I thinking??????)  That means that there are 360 inches  of binding to stitch down!! I am not very fast, so was thinking that I could do 1" in a minute. (allowing some time to re-thread needle, untangle the thread....cut the thread that I cant untangle because it is now a knot....pull back the thread to tie it off.....re-thread needle .....and repeat.) That would take me 360 minutes, or 6 hours!!!  Yikes! I had better get busy!

Monday, March 7, 2011

cleaning up after myself

I make sure to clean up my sewing machine after I finish quilting a project, and sometimes during if there is a lot of lint/dust.  If you wonder why...look at this.... check out those feed dogs....its just packed right in there!!

make sure to take of the plate, and pull out the bobbin case too....

I have a little brush that does a pretty good job of picking up all the lint/dust.

Monika over at My Sweet Prairie just had a great Tips for Tuesday talking about cleaning. She suggested a little vacuum attachment. I don't have one, but it sounds like a great idea.

Anyway...all cleaned up and ready to go again!!

Sunday, March 6, 2011

Border town

I love borders...I think that a border really finishes off a quilt. I think I add borders to everything, sometimes two of them.  Only problem is I seem to have some issues with quilting them. Although I am getting better.
I bought a new pencil...
(oops, bad picture....you can see the one place that I ran out of material, and had to add a little piece to the border!)
The pencil is Roxanne's Quilter's Choice, and I really like it (That you Deb at Periwinkle's)  After studying my little free motion "primer" again, and decided on a pattern called "Fickle Feather Border"

The instructions say to sew up the "spine" first and then do the feathers on the way back down. So first I drew the spine on with my trusty new pencil....so far, so good......

Then the problems began! First of all....I can stitch in the ditch with my eyes closed, but do you think that I can sew on a long curvy line?  NO, I can't! I felt like I was in kindergarten trying to color inside the lines!! So the spines were pretty squiggly (is that a word??)  Then I started the feathers....my coloring inside the lines got worse! So I finally just did them free motion, which was easier for me.

I got better as I went along. I can see where a lot of practice will make a huge difference. By the end of the fourth side I was doing well.....If the quilt had six sides- I would be perfect !!

I did little patterns on the corners, and they turned our really nice. I love them. I seemed to do OK with a small pattern like this. Maybe I should just do smaller patterns along a border?
I have also had lots of suggestions to use paper or Press & Seal, and then draw on that and sew through it, so I might have to do some more experimenting with this.
Now on to the binding ....don't you just love a good adventure?

Saturday, March 5, 2011

Quilting again : )

It was a great day! I completely ignored all the housework, and homework that I should be doing and spent the day quilting. I started free motion quilting the Yellow Brick Road quilt.....guess I need to think of a better name for it. Oz?? Dorothy?? Wandering??  How about "The Minstrel" ??  I think I like that one.

Anyway, the quilting went really well, for the most part. I started by studying my "primer" and decided to stay with a meandering pattern.

Next I practiced a bit with a pencil and paper, just to get the idea in my head....and hands I guess....
I have not tried this pattern before, even though I know it is supposed to be one of the easiest.....and it is! Wow, so much easier than what I tried before. You just meander around, and if you get yourself into a corner, or an area that already been stitched...you just meander yourself right out again!

I just wanted to mention a few things I learned....mostly by doing them wrong the first time. This will be old news for most people, but those of us just learning some of these simple things make a big difference.

  • !t really helps to have a extension table, or at least a bigger sewing table to hold the weight of the quilt.

  • adjust your speed if you can. I set my machine to a moderate speed (actually increased a bit as I got more comfortable) and then you can put the peddle down and not have to worry about it racing away on you. 
  • You don't have to move the quilt quickly. Just because it seems like the machine is going fast you can quite leisurely meander around. The goal is to keep the stitch length uniform..well sort of uniform :)
  • Although the goal is to keep one continuous path, you need to stop and start frequently to adjust the quilt or to remove pins. Be sure to stop in the "needle down" position. Often there is some tension or pull on the needle as you start again, and as you start to sew the quilt moves slightly, causing a little jog.  I found that checking the quilt position first, and starting very slowly helped to prevent this. 
  • The books suggest that you roll the quilt up, as you are only working on a small part at one time. Well, I started with a roll, but quickly ended up with a pile!  I found the best method was what I came to think of as a "scrunch and munch" method...scrunch up most of the quilt and just worry about the piece you are working on (or munching away at !!) 
  • Be sure the weight of the quilt is not pulling on the area you are working. When it is going smoothly it almost feels like it is floating through. If it feels like you are working then stop and readjust the quilt. Sometimes if you don't, it will suddenly let go a bit and then jump ahead, producing a great big stitch!
  • When starting, (like after you have changed a bobbin) it helps to pull the bobbin thread up to the top...then you don't get that little "nest" of thread underneath. To do this start with the pressure foot down, and hold the top thread...

complete one full stitch - needle down, needle up. and pull the top thread to bring the bobbin thread to the top....

pull both threads under the foot, and sew a little ways. 

Then you can stop and clip both threads. 

 This seemed to really help, and only takes a moment once your try it a couple of times. 
I also start and stop with very small stitches or a little back stitch each time to secure the thread.
Of course I made lots of other mistakes  discoveries, but I will save those for another day LOL.

Next is quilting the borders...then the binding...then it is finished !!


Friday, March 4, 2011

Not very productive today

Today we got to babysit our grand daughter, who is 2 yrs old......and cute as a button...and soooo good.....and did I mention smart???

Consequently I really didn't get much done today. I did go back to my local quilt store, periwinkle quilting and buy some extra flannel because I was a little short of material to finish cutting out the fuzzy flannel that I started last week. I chose some tan colored flannel, to blend the pinks (which are actually brighter than they look) and green together...I think...what do you think?

It is all cut out now, so just need to find some time to sew it together!
Maybe this weekend...it is still cold here, and lots of snow. This is my back deck...

and the hot tub, that obviously we have not used for awhile LOL.

Thursday, March 3, 2011

dreaming of somewhere warm

I dont really have anything to say! I have been buried under paper and glued to my computer for the past few days....but hopefully will come up for air this weekend!! Needless to say, the closest I have come to doing any sewing is filling up several bobbins, so I am ready to start the free motion adventure again!

It is also very cold here....and I am tired of the cold. Some mornings it has been -40 with the windchill! And -40 is -40 whether you are talking Celcius or Farenheit!   Thats Cold!!! 

So my solution is to day dream about somewhere warm...

I have no idea where this is, but it looks nice.....and there is NO SNOW!!!
I can just see myself, wearing my big sunhat (the Lady Gaga type) and walking around this lovely lily pond. Can't you see that?

Wednesday, March 2, 2011

Lesson Learned


I finally did get back to the last quilt top that has been hidden under a pile of other things for too long. So I started pinning it together. I like the backing for this one. I tend to use a patterned backing at this point because it is much more forgiving with the free motion quilting as you cant see small mistakes and accidental crossovers so easily.

And then I decided that I would treat myself to some new pins. I like using the curved safety pin style.

I had some but didn't have a lot of them, so bought a couple of new packages.  Well, obviously the quilt gods...or maybe the Chinese factory where they were manufactured .....decided that I was not worthy of a treat! They were a night mare!! Some of the head broke right off! And lots, and lots, of them had little hooks on the end of the point!! 

YIKES! If they did go through, they caught on the batting and pulled little bits through the backing. And if I tried to pull them back out they caught again! Needless to say, I ended up throwing a lot of them away. : ( 
I was so frustrated! I did take some back and showed them to the sales clerk and she said "They just don't make them like they used to, do they" I was speechless....and for me that is saying a lot!

So I am not quite sure what the lesson I learned was #*#??? but maybe next time I will open the package and test them first, I guess ! 
But the good news is that I got the quilt top all pinned and ready to quilt! I think I will try an all over meandering pattern on this one. It is a Yellow Brick Road pattern. What do you think?